We've looked at how to go about asking for permission to make an instructional origami video, how to prepare yourself for recording the raw material, and then what to watch out for while recording. In this next installment of my comprehensive guide to making origami video tutorials we'll bring it all together by editing the material to get the final video. As before, these are recommendations that I have come to work by through my experience of making origami videos. You may well prefer going about this differently in some aspects, or totally differently. One might imagine recording a video such that no further editing is necessary whatsoever. However, I believe this is extremely hard to accomplish while getting a final video of similar quality. So the advice given in this article should prove useful for both video creators and those interested in the process.
Programs Used
Up to this point not a lot of software was involved in the process of making a video. But for editing, some programs will be necessary. In the different steps I execute to finish my edited video, different programs will come into play, and I will mention them as we go along. To give you an overview, though here is a list of the programs I currently use.
- MPEG streamclip (free, for Mac and Windows)
- This is a video converter, which allows me to convert MPGs, the format in which my video camera records, to AVIs, which I can edit more easily. Similar other programs exist, but this free one has actually worked really well for me.
- Final Cut Express (successor Final Cut Pro X priced at approx. 300 USD, Mac only)
- This is the main program I use for editing the video material. The main features I need are being able to cut and remove parts of the video, as well as add text and imagery to the video. I used a couple of other programs before this, and must say that Final Cut Express is vastly superior to all of them. This program is actually the reason I bought a Mac and started working on MacOS for my videos.
- Gimp (free, cross-platform)
- For editing images, I use Gimp, a free, yet quite powerful image editor. Many other programs will have the features you probably want to use for adjusting your pictures. If you already have such a program, it's probably best to stick to what you know.
- Inkscape (free, cross-platform)
- Inkscape is a free, vector-graphics program. I use it to draw diagrams or to post-process diagrams others have created. Similar, commercial programs include Macromedia FreeHand (although this is not being updated anymore) and Adobe Illustrator.
I didn't start with this set of programs, but found them to be most useful as I developed and streamlined my editing process. So every time I changed a program, it helped me edit my videos faster and more easily. Hence the most recent list will probably also be most helpful to you.
Now, let's see how these programs come into play!
Step 1: File Formats Matter
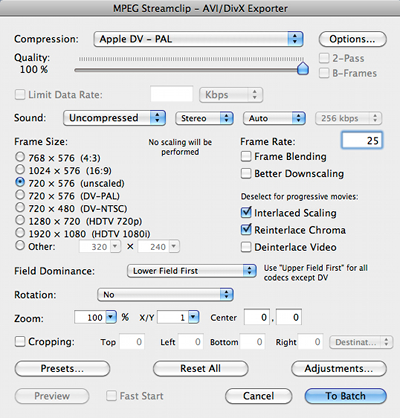
Videos can be stored in different formats. These will have an effect on file size and image quality, and your choice might be affected by which formats your video editing program handles best. For example, my video camera records videos in MPG format, as do many other video cameras. However, my video editing program needs to pre-process that file format, which takes considerable time. Additionally, whenever I edit the video (e.g. cropping a part out), that pre-processing work has to be done again. This means editing the video can get very slow, and not enjoyable at all. Additionally, and far worse, audio playback doesn't work, either, as the audio is encoded in a way that my program doesn't seem to be able to read it. As we'll see later cutting at the right point not just in the video, but also in the audio track is very important, though.
However, I did find that my program does not need to pre-process AVI files. And when I convert my video from MPEG to AVI, I can also specify how the audio track shall be encoded. By storing it in an uncompressed way, with the help of MPEG Streamclip I get all my raw video material in a format that will allow me to quickly and conveniently edit it.
This does come at a cost. The resulting AVI file is considerably larger, and the image quality is slightly lower. For example, for the Crooked Witch video I recorded a 605MB MPG, which I then converted to a 5.98GB AVI. So the AVI file is ten times as large as the MPG file. It's a tradeoff I'm more than willing to make, as it eases my flow a lot. Additionally, when I render the final video, I further reduce the quality (for YouTube), which means that the initial loss of quality doesn't really make a difference at all.
I recommend anyone who wants to edit videos to explore the program they will be using and figure out which file formats it supports, and which ones are easiest to work with. Converting to those file formats can save you much time and pain in the next step: cutting the material.
Step 2: Cut Rigorously
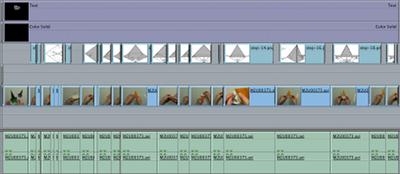
I don't know about you, but when I record - and I've done quite a bit of it - I don't get everything right the first time round. Sometimes I mispronounce a word, need to cough, the church bells ring, or I simply take a break to think about how to express what to do next best. And I often draw in crease lines to make them more visible in the video.
The truth is that all of that material is unnecessary for the viewer. Even more, it's actually distracting and so it's best to get rid of all the evidence that you fumbled and stumbled here and there. Or that you don't actually have magic paper, but that it's just a matter of cutting smartly.
This means that when viewing your raw material consider which parts are acceptable to remove. My general rule of thumb here is: If something does not add value, remove it. Cut the video into three parts, where the middle part only includes material you want to remove. Then delete that middle part, and continue scrutinizing the rest of the video. I do this often. To give you a general sense, I record approximately twice as much material as the final video will have. This means I'll remove half the material via many cuts throughout the video.
But what material do I most commonly remove? Here are my top three:
Longer pauses
I don't script my videos, and usually don't plan ahead in detail how I will explain each step. This means that while recording the videos I regularly take a quick break and think about what the next step is and how to best demonstrate it.
I know I'll need these breaks, so while recording I'll try and make sure that editing out these breaks is as easy as possible. Mostly, this means I try to keep my hands and the model as still as possible. Once I remove the material, I don't really want it to be visible. Generally, a cut is not visible if the frame before the cut, and the frame after the cut look the same, or very similar.
Correspondingly, the cut will not be audible if the audio track before and after the cut are very similar. Usually the background noise will not change much throughout your recording, so this is easier to achieve than a smooth visual cut. But be aware that cutting while you speak is hard to get right, and if there's a temporary change in background noise, wait for it to pass. Common examples of a change in audio you'll want to completely cut out of your video are street noises, such as an ambulance driving by, church bells or a phone ringing, or simply people talking.
Magic paper
I'll reveal the secret. No, I don't have magic paper. The lines that appear on the paper when I crease it aren't the result of a cool pulp mix that results in paper perfect for educational purposes. Oh, how I wish that existed!
The truth of the matter is I make a crease, then unfold the step, draw in the crease line, refold the step, then unfold it again, and then continue with the next step. The trick is that I'll remove the part of the video in which I unfold the step, draw in the crease line, and refold the step. So as a result all you see is me folding a step, unfolding it, and showing a drawn in line exactly where I made the crease.
These kind of cuts are a bit harder to get right than removing pauses, because it's necessary to both move your hands and the model somewhat. But there are some tricks that do help to make even these cuts very smooth.
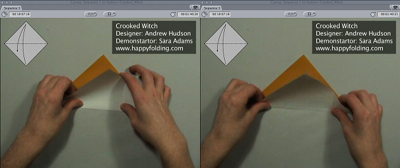
Remember how I mentioned above that the smoothest cuts are achieved if the frames before and after the cut are almost the same? That was a simplified explanation. Not just those two frames matter. Basically, a cut will be smooth if removing a part of the video does not disrupt the flow of the sequence of frames before and after the cut. This means if you have lots of movement in the frames before and after a cut, then the tolerance for change at the cut is bigger. In other words, if the frames before the cut differed quite a bit, and the frames after the cut differ quite a bit, then having a bigger difference between the two frames before and after the cut won't be disruptive. But when do consecutive frames in a video differ a lot? When there's a lot of movement. So how does that help us with making smooth cuts? Basically, cut while there's a lot of movement. This obviously is exactly the opposite of what I said before. But actually, both are fine. Either cut when you can establish two very similar frames. Or cut when there's a lot of change happening in any case.
Now in my first example, it was easy to achieve two very similar looking frames. But because I need to move my hands to draw in a line, this is much harder. Sometimes it works, because I do try and place my hands in the same spot as before. But more often it's easier to cut where there's lots of movement. And the great thing is: there always is! Remember how I said I that the final result is me folding a step and then unfolding it to show the crease line? Well, unfolding a step is fast, and means a lot of movement. This is where I most often make my cuts. Now don't get me wrong. Having good placement of your hands, and not moving the model if at all possible is still important. But there's a bit more tolerance. And every little bit helps!
Mistakes
Finally, sometimes I simply don't get it right the first time round. The most common mistake I fix is actually right in the beginning of the video. When I start recording I usually need a minute or so to get into the zone, so to speak. In the beginning of the video I usually state the model of the name, the designer, what paper to use, and how large the resulting model will be. On average, I'll probably start three or four times until I actually feel like I started it sufficiently well, and proceed. So usually I'll chop off about a minute in the beginning, and after that I'm ok.
That's the easiest mistake to fix, because I haven't even added a crease to the paper yet. That's probably also why I'm totally ok with allowing myself those seconds of adjustment in the beginning. A bit harder to fix are mistakes where I show a step and find that I showed it badly. There are two ways to go here. Either unfold the step, and remove the material showing your first attempt. This has the disadvantage that placing your hands and the model in the same place again (for a smooth cut) is hard. And the paper will already have a crease that the viewer doesn't have in their model yet. Or live with the fact that you showed the step badly and simply show it again. This could be by unfolding the step and showing it again (without removing this material). Or you can show the step more nicely on a different part of the model. Thankfully, many steps need to be repeated on the other side!
Step 3: Adding Text and Imagery
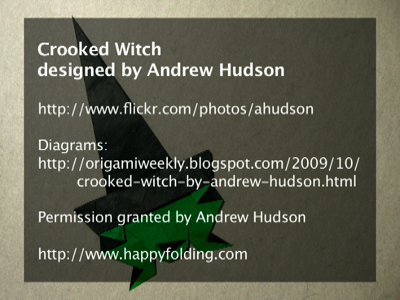
Once I'm done with cutting the video material as I deem appropriate, I start adding further content to the video. This usually includes a photo of a finished model, which I show in the beginning of the video, as well as text including the model of the name, the designer's name, and where applicable their website and a source for diagrams. Additionally, throughout the video I show the most basic information (model name, designer's name, my name) throughout the video in the top right corner.
Which kind of credits you show will probably also depend on what you agreed on with the designer of the model. Most designers will appreciate both being mentioned in the audio track, as well as having their name and model included as text in the video. This is also an advantage for the viewer. For example, it will make it easier for them to credit pictures correctly or search the web for further work by the same designer. After all, when you hear a name, you might not necessarily know how to spell it. This is especially true when the demonstrator mispronounces the name, which I'm sure I have done often enough.
But there's another reason why adding credits is important. The truth of the matter is, I don't know whether others will (without permission) copy my videos, edit them to their needs (e.g. replace the audio track), and reuse them. I cannot prevent it. If I come across a copy, I may be able to get it removed (and have done so in the past). But it's hard to keep track of where illegal copies might be offered online. So at least I can ensure that it's hard to hide who the real people to credit are. Namely, the designer of the model, and the person demonstrating it. This is important enough for me that I will give up some of the frame's space for credits throughout the video.
In the end of the video I usually show the picture of a finished model (as in the start) again. I believe that gives the video a nice story. It starts with what we want to produce, continue with how to proceed, and then ends with what we've actually produced and how it compares to the picture.
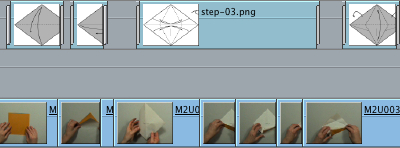
On some more recent videos I've also started showing small diagrams in the top left corner. As the top right is already used by credits, the top left corner is usually unused. And I think showing diagrams can help clarify steps, and help viewers learn how to read diagrams.
Adding diagrams is a bit harder, because you have to first get the imagery of the diagrams, and then have to figure out where exactly to show them in the video. This means figuring out when the best time is to start showing a diagram step, and when to stop showing it again.
Another alternative I've seen is that people show the diagram in the full frame. This obviously makes a rough cut and interrupts the flow, but does have the advantage that you can show a bigger image of the step, rather than just a small one in the corner of the frame.
Either way, if you do decide to add diagrams, make sure to ask for permission for this, too. A designer may be comfortable with you showing how to fold their model, but not you also reusing diagrams they drew or others drew for them.
Step 4: Voice Overs and Background Music
You may be done now. Or have a big part of your work ahead of you.
In the previous sections I assumed that you are editing the audio track together with the video track. This is because I record the verbal instructions simultaneously with the video. I speak while I record.
But you may prefer recording the visual only, and then adding verbal instructions. If that's the case, at this point you'll want to add those verbal instructions. You'll have to experiment a bit with what you say to ensure that you have enough time to say it. This can be very challenging. I don't have a lot of practice with it, and have done a full voice-over for one video only. (Unfortunately, it's currently not available online.) But while it's a lot of work, I will say that it can result in very high-quality results. You can avoid any mispronunciations, grammatical mistakes, and strange sentence constructions. But it will be a lot of work. I've decided for myself that it's too much work, and there's a risk of the video getting less personal and relatable. However, there are other video creators that do go this path. For example, I believe Charles Santee (aka firstfold) often adds his audio tracks after recording.
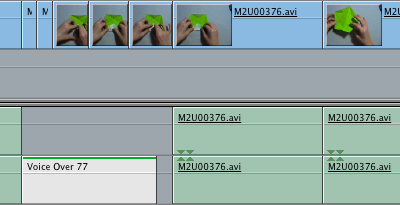
I sometimes do add voice-overs to small parts of a video. For example, I may have used a wrong word, edited in a way that cut through an inconvenient part in the audio track, or simply talked nonsense. In these cases I remove the audio track for a small part of the video, and record new audio for it. I haven't done this much, and have to admit that the audio is usually so different that you can easily detect I've added a voice-over. But the truth is, it's very hard to record an audio track that fits in - while using a different microphone and having a different level of background noise. Usually hours or a day will have passed since the initial recording when I add voice-overs.
Finally, you may not want to add verbal instructions at all. But you may want to add background music. I have to admit I'm not a big fan of this, because it doesn't add educational value, and music tastes differ greatly. But I know many people do like adding music, perhaps because it adds an emotional or relaxing atmosphere. In any case, if you want to add background music, this is also the time when you'll want to add it. Now that you know how long the video will be, it will probably also be easier to decide on which musical piece is most suitable. And of course asking for permission is in order again - or you use music that you are free to use for this purpose.
Step 5: Rendering the Video
We're almost there! Right now you probably have a file stored in the format of your video editing software. It probably consists of a couple of tracks - one for images, one for credits, one for video, one or two for audio. And each track probably has several chunks of material. For example, when continuously cutting the video to remove material, you created many shorter video snippets from the initial long one.
You will now want to convert these tracks and snippets of data into one video, which the viewer can view and listen to. And that's what's done when the program renders your video. Depending on the program you are using it might be called "render" or "export to" or perhaps even "save as". In either case, it's probably going to take a while for the program to complete this step. For me this is the time I usually desperately need sleep, so I'll start rendering and wake up to the program being done. Or almost done, at least. Rendering can take hours, depending on how much and what kind of editing you have done, how long the video is, what quality you want the video to be rendered in, etc.
Many programs will offer you a variety of settings to determine these factors. But because rendering an actual video project can take some time, I strongly advise you to explore the options on a short test project first. Once you have figured out a set of options that give you a final video you are happy with, use those same options on your actual project. There's nothing less frustrating than waiting six hours for your video to render to then realize that you simply aren't happy with the quality of the output. And once you know which options work, you can probably use them for all your projects!
Step 6: Sanity Checking
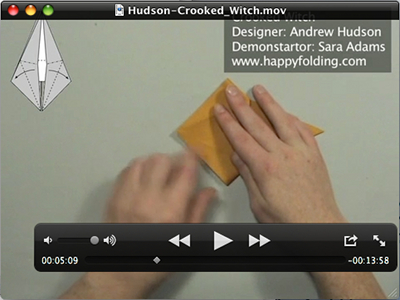
In the end of the previous section I actually already hinted at this one final step, which might not quite be the final one: doing a sanity check. Once the video has rendered, it's a good idea to watch the video and check that all is ok with it.
Are there any rough cuts in there that you need to fix? Are all images placed correctly? Did you perhaps forget to remove a part of the video, or worse, accidentally removed a part you did not want to remove? Or is there anything else you'd like to change before you share it with others?
If possible, it's also really valuable if someone else can watch the video at this point. By this I mean you don't make it available to your whole audience yet, but just to someone whose opinion you trust and appreciate. It's like asking a friend to proof-read something you wrote. You yourself may have become blind to some mistakes, but they see them right away.
I'll also be honest here, and say that with time my sanity checking has gotten more lazy in some ways, in others more thorough. How am I lazier than before? I don't always watch the full video anymore. Usually I look for hot spots - the beginning, areas where I added imagery, and the end. If those look ok, probably the rest is ok, too. And how have I gotten more thorough? I've started asking others to review the video. Often, this is my friend, Anna Kastlunger (thank you!), who also moderates one of the most frequented origami forums. And if the designer wants to, I offer them the option to view the video before I post it and suggest errors or improvements. Essentially, I give them a veto to say they do not want to have the video appear as is. Thankfully, this has never happened thus far, but I have changed some videos after I got feedback from my early viewers. This feedback is invaluable and I appreciate it a lot.
Of course, finding out that there's something you have to fix also means some extra work. It may be small changes, but it may also be a lot more work. For example, I have recorded parts of a video from scratch again, because I wasn't happy with how I'd presented it the first time round. And once I threw everything away and started anew completely. It's sometimes tough to make such a decision, because you'll have put considerable time into the video already. But it's good to remember that you do the work once (or twice), whereas the result will ideally be watched by many. And only a good video will be understandable and enjoyable for them. So if you have a hard decision to make with respect to whether to change something or not, consider not just what it means for you, but also for others. This includes, by the way, doing the designer's work justice.
Step 7: Now What?
With the video finished and done, two tasks remain to be done. The first concerns how including closed captions (aka subtitles) can add value to your video. And the second task is about how to make your video available to others, as well as announce it so they know of it. I'll give an example by outlining my procedure of uploading a video to YouTube and posting the news to the community. This will be featured in the next article.
